

FacebookTwitterLinkedIn

English translation by ChatGPT

Ahmed Zayed 8/2/1/1 أساسيات الجافاسكريبت 'الـ Arrays'Ahmed Zayed 8/2/1/1 أساسيات الجافاسكريبت 'الـ Arrays'

Course

دورة تدريبية

8/2/1/1 أساسيات الجافاسكريبت 'الـ Arrays'

تطوير المواقع الإلكترونية MEAN-Stack from A to Z الأساسيات Level1

تحدثنا من قبل عن وجود نوعان من أنواع الـ Data Types في الجافاسكريبت الأول هو Primitive Types و الثاني هو الـ Non Primitive Types و تعد الـ array و الـ object من أنواع البيانات الـ Non Primitive و سنتطرق للإختلاف الجوهري بينهما لاحقا عند الحديث عن كيف يتم تنفيذ الكود في الجافاسكريبت
الـ Array هي عبارة عن متغير يمكن ان يحتوي علي العديد من المتغيرات و هو من أكثر العناصر البرمجية شيوعا و إستخداما حيث أن الداتا أصبحت هي أساس أي تطبيق و الـ array صممت بالأساس لتعمل على البيانات فمثلا لو كنا نقوم ببرمجة تطبيق يقوم بإدارة المخازن هل من المنطقي ن نقوم بإنشاء متغير لكل صنف من أصناف البضاعة بالمخزن؟ حتى لو حاولنا عمل تلك المهمة فإننا في الحياة الواقعية في مجال تطوير المواقع و التطبيقات نتعامل مع كم متغير من البيانات لا نعرف عدده و لا نعرف كيف سيزيد أو سينقص في حالة مثال برنامج إدارة بضائع المخزن فمن الوارد أن تظهر أصناف جديدة لم تكن معروفة وقت البرمجة أو أن تختفي أصناف من السوق فهنا تأتي أهمية وجود الـ array فيمكننا كتابة متغير واحد يحتوي علي أي عدد من الأصناف كمثال
Code

      let products = ['sugar','oil','rice','salt'];
  
تعتبر الـ array نوع من الأنواع الخاصة من الـ data types و يمكنها التعامل مع أي data type اخر بمعني اخر من الممكن أن تحتوي الـ array على انواع متعددة من الـ data types و أيضا من الممكن أن تحتوي الـ array علي arrays أخرى ما يطلق عليها nested array او مصفوفات متداخلة مثل:
let myArray = [1,"hi",[1,2,3]];
الـ array تحتوي علي بيانات متسلسلة و كل عنصر بداخل الarray يمتلك index يبدأ من 0 و ينتهي عند رقم يساوي عدد عناصر الـ array – 1 في المثال السابق هناك 4 عناصر في الـ array أولهم sugar يكون الـ index له 0 و أخرهم salt يكون الـ index له عدد عناصر الـ array - 1 أي 4 -1 = 3. يعتبر الـ index هو أساس عمل الـ array حيث من خلاله نستطيع الوصول لأي عنصر من عناصر الarray فمثلا إذا أردنا طباعة أول عنصر من عناصر الـ array يمكننا استخدام الكود التالي:
Code

      console.log(products[0]);
  
و سيتم طباعة sugar أول عناصر الـ array اذا للتعامل مع قيمة أي عنصر من عناصر الـ array نقوم بكتابة اسم الـ array و بعده رقم الـ index الخاص بالعنصر بين قوسين من هذا النوع []

العمليات الخاصة بالـ array

1- معرفة عدد عناصر الـ array

عن طريق length كما في الكود التالي :
Code

      console.log(products.length);
  
و يمكن الوصول لقيمة أخر عنصر من عناصر الـ array عن طريق ايجاد الـ index الخاص به length – 1 كما بالكود التالي:
Code

       console.log(products[products.length -1]);
  

2- الوصول لـ array بداخل array و إحضار قيمة منها

في حالة الnested array يمكننا الوصل للـ array الداخلية كالمثال التالي:
Code

      let myArray = [1,"hi",[1,2,3]];
      console.log(myArray[2][0]);
  
و بذلك يطبع الـ console رقم 1

3- تغيير قيمة أحد عناصر المصفوفة

مثل أي متغير نستطيع إعادة تعيين قيمته ايضا في الـ arrays نستطيع إعادة تعيين القيمة عند تحديد العنصر بالـ index و اعطاءه قيمة جديدة مثل
Code

      let products = ['sugar','oil','rice','salt'];
      products[0] = 'pasta';
      document.write(products);
  
و عند طباعة هذا الكود يتم كتابة الأسماء التالية: pasta,oil,rice,salt

4- إضافة عنصر للـ array

يمكن إضافة عنصر للـ array بأكثر من طريقة

إضافة عنصر في اخر المصفوفة

مثلا array تحتوي علي العناصر 1 2 3 و نريد اضافة رقم 4 في أخر المصفوفة بعد الرقم 3 نستخدم push كما في الكود التالي
Code

      let myArray = [1,2,3]
      myArray.push(4);
      document.write(myArray);
  
و ستكون نتيجة الكود كتابة 1,2,3,4 أيضا يمكننا إضافة عدة عناصر و ليس عنصر واحد مثلا لو قمنا بتعديل الكود هكذا
Code

      myArray.push(4,5,6);
  
تكون نتيجة الكود 1,2,3,4,5,6

إضافة عنصر في أول المصفوفة

يمكن ذلك عن طريق unshift كما بالكود التالي
Code

      let myArray = [1,2,3]
      myArray.unshift(0);
      document.write(myArray);
  
و بذلك تكون النتيجة 0,1,2,3 أيضا يمكن لـ unshift أن تأخذ أكثر من عنصر مثلا
Code

      let myArray = [1,2,3]
      myArray.unshift(-1,0);
      document.write(myArray);
  
و بذلك تكون النتيجة -1,0,1,2,3

5- حذف عنصر من الـ array

أيضا يمكن مسح العنصر من الـ array بطريقتين

حذف عنصر من نهاية الـarray

يمكن ذلك عن طريق إستخدام pop كما في المثال التالي:
Code

      let myArray = [0,1,2,3]
      myArray.pop();
      document.write(myArray);
  
و بذلك يكون ناتج الطباعة 0,1,2
و يلاحظ أن الأمر pop عكس الأمر push و لكن لا نقوم بتمرير أي قيمة له و بالطبع منطقي لأننا نريد فقط حذف عنصر و ليس من المهم قمية العنصر المراد حذفه بينا عند إضافة عنصر يجب أن نحدد قيمة العنصر المراد إضافته لذلك كنا نمرر قيمته في الأمر push
أيضا نلاحظ أن الأمر pop يقوم بحذف أخر عنصر من المصفوفة و الإحتفاظ به و يمككنا التحقق من ذلك عن طريق الكود التالي:
Code

      let myArray = [0,1,2,3]
      console.log(myArray.pop());
  
و سيتم كتابة 3 في الـ console عند تنفيذ الأمر

حذف عنصر من بداية الـ array

عن طريق الأمر shift الذي يعد أيضا عكس الأمر unshift الذي إستخدمناه لإضافة عنصر و أيضا مثل الأمر pop يقوم الأمر shift بحذف عنصر من أول المصفوفة و الإحتفاظ به مثل الكود التالي
Code

      let myArray = [0,1,2,3]
      console.log(myArray.shift());
      document.write(myArray);
  
عند تنفيذ ذلك الكود سيكتب في الصفحة 1,2,3 و سيكتب في الـ console القيمة 0

6- حذف عنصر أو عدد من العناصر من الـ array

يمكن استخدام الأمر splice لتأدية تلك المهمة و هو أمر شديد الأهمية يمكن من خلاله تأدية مهام حذف و إضافة معقدة علي الـ array يتم تمرير عدد من القيم لذلك الأمر البداية تمرير قيمة الـ index الذي سنبدأ الحذف من عنده , بعدها يتم تمرير عدد العناصر المراد حذفها من المصفوفة كالتالي:
Code

      let myArray = [1,2,3,4]
      myArray.splice(1,2)
      document.write(myArray);
  
و بذلك يصبح الناتج 1,4 لاننا قمنا بتمرير index البداية بـ 1 و هو يعني ان البداية من العنصر الثاني من المصفوفة , و قمنا بتحديد عدد العناصر المراد حذفها بـ 2 لذلك قام بحذف العنصر الثاني و الثالث في الواقع الأمر splice لا يقوم بحذف عناصر المصفوفة هو يقوم بتقطيع المصفوفة و الإحتفاظ بالعناصر المقطوعة من المصفوفة في مصوفة أخري كما في الكود التالي:
Code

      let myArray = [1,2,3,4]
      let myNewArray = myArray.splice(1,2);
      document.write("my old array: " + myArray);
      document.write(' my new array: ' + myNewArray);
  
و بذلك يكون الناتج

7- استبدال عناصر بالـ array

ماذا لو اردنا كما في المثال السابق حذف مجموعة من العناصر و لكن إضافة مجموعة أخري من العناصر بدلا منها , يمكننا إستخدام الأمر splice نفسه و تمرير العناصر المراد إضافتها فبعد تحديد عنصر البداية و بعد تحديد عدد العناصر المراد حذفها يتم تمرير العناصر المراد إضفاتها مكان العناصر المحذوفة كالتالي:
Code

      let myArray = [1,2,3,4]
      myArray.splice(0,2,-1,-2);
      document.write(myArray);
  
في الكود السابق قمت بحذف عنصريين من الـ array بداية من الموضع 0 (أول الـ array) و قمت بإضافة بدلا منهما عنصريين أخريين و يمكن إضافة أي عدد من العناصر دون التقيد بعدد معين ممكن أن نقوم بحذف عنصريين و إضافة 4 أو 5 عناصر تبعا لإحتياجتنا.
Code

      في الكود السابق قمت بحذف عنصريين من الـ array  بداية من الموضع 0 (أول الـ array) و قمت بإضافة بدلا منهما عنصريين أخريين و يمكن إضافة أي عدد من العناصر دون التقيد بعدد معين ممكن أن نقوم بحذف عنصريين  و إضافة 4 أو 5 عناصر تبعا لإحتياجتنا.
  

8- اضافة عناصر للـ array

تحدثنا من قبل عن كيفية اضافة عنصر للـ array في أوله أو أخره و لكن ماذا لو أردنا إضافة عنصر في وسط الـ array يمكن أستخدام اكثر من طريقة مثلا يمكننا استخدام الأمر السابق splice و لكن من دون تحديد رقم العنصر المحذوفة كالتالي:
Code

      let myArray = [1,2,3,4]
      myArray.splice(2,0,2.5,2.6);
      document.write(myArray);
  
و تكون النتيجة 1,2,2.5,2.6,3,4 و هنا نلاحظ أن بعدم تحديد عدد العناصر المحذوفة قام الأمر splice بترحيل العنصر الثالث و الذي يحمل index رقم 2 ليضع العناصر المضافة مكانه و تسبقه في الترتيب

9- إنشاء array جديدة بعناصر من array موجودة بالفعل

يمكن استخدام الأمر slice للقيام بتلك المهمة كالتالي:
Code

      let myArray = [0,1,2,3,4,5,6,7]
      let myNewArray = myArray.slice(1,4);
      document.write('my old array: ' + myArray + " my new array: " + myNewArray);
  
و تكون نتيجة تنفيذ الكود my old array: 0,1,2,3,4,5,6,7 my new array: 1,2,3
يلاحظ أن الأمر slice علي عكس splice لا يأخذ عدد العناصر التي سيتم التنفيذ عليها و لكن يأخذ قيمتين قيمة index البداية و قيمة index النهاية ايضا يمكن نسخ كامل الـ array لو لم يتم تمرير قيمة البداية و النهاية و اذا قمنا بتحديد index البداية و لم نقم بتحديد index النهاية سيتم نسخ العناصر من index البداية إلي أخر الـ array ايضا يمكن التعامل مع عناصر الـ array بعكس الترتيب من الأخر للأول عند استخدام أرقام سالبة للـ index مثل

let myArray = [0,1,2,3,4,5,6,7]
let myNewArray = myArray.slice(-4,-1);
document.write('my old array: ' + myArray + " my new array: " + myNewArray);
و يكون نتيجة تنفيذ الكود my old array: 0,1,2,3,4,5,6,7 my new array: 4,5,6

10- التأكد من وجود عنصر داخل الـ array

يمكننا البحث بداخل الـ array عن طريق استخدام indexof و هي تمكننا من معرفة رقم الـ index الذي يحتوي علي القيمة المراد البحث عنها مثلا كما في الكود التالي:
Code

      let myArray = ['sugar','oil','rice','salt']
      console.log(myArray.indexOf('oil'));
  
في الكود السابق سيكون النتيجة 1 أي أن oil بالفعل موجودة و موجودة في العنصر الثاني(تقوم بإرجاع رقم الـ index ) و تقوم بإرجاع 1- في حالة لم يوجد أي عنصر بالقمة المراد البحث عنها أيضا يمكن البحث بداية من index معين مثلا الكود التالي
Code

      let myArray = ['sugar','oil','rice','salt']
      console.log(myArray.indexOf('oil',2));
  
يتم البحث عن oil و لكن بدأ من العنصر الثالث و بالطبع سيقوم بإظهار -1 لأنه سيكون غير موجود بالنسبة له أيضا لو تكرر العنصر أكثر من مرة سيقوم بإحضار index أول عنصر يجده يحمل تلك القيمة
Code

      let myArray = ['sugar','oil','rice','oil','salt']
      console.log(myArray.indexOf('oil'));
  
في هذا الكود سيتم إرجاع رقم 1 أيضا ماذا لو أردنا اخر index يحمل القيمة المراد البحث عنها في تلك الحالة يمكن استخدام lastindexof كما بالكود التالي:
Code

      let myArray = ['sugar','oil','rice','oil','salt']
      console.log(myArray.lastIndexOf('oil'));
  
و تكون النتيجة 3

11- إعادة ترتيب عناصر الـ array

يمكن استخدام الأمر sort لترتيب الـ array كما في الكود التالي:
Code

      let myArray = ['sugar','oil','rice','salt']
      console.log(myArray.sort());
  
و يكون ناتج تلك العملية ['oil', 'rice', 'salt', 'sugar'] أيضا يمكن استخدامها لترتيب array تحمل قيم رقمية مثل:
Code

  let myArray = [1,3,0,2,9,7,8]
  console.log(myArray.sort());
و تكون نتيجة تلك العملية [0, 1, 2, 3, 7, 8, 9] أيضا هناك أمر يرتبط بالترتيب يسمي reverse و يقوم بعكس الترتيب كما بالكود التالي:
Code

  let myArray = [1,3,0,2,9,7,8]
  console.log(myArray.reverse());
و تكون نتيجة ذلك الكود [8, 7, 9, 2, 0, 3, 1] يمكن استخدام الأمرين معا للترتيب التنازلي من الأكبر للأصغر كما بالكود التالي:
Code

  let myArray = [1,3,0,2,9,7,8]
  console.log(myArray.sort().reverse());
و بذلك تكون نتيجة الكود [9, 8, 7, 3, 2, 1, 0]

12- الدمج ما بين أكثر من array

بإفتراض اننا نريد دمج array تحمل القيم التالية 1, 2, 3, 4 و array أخري تحمل القيم التالية 5,6,7,8 يمكننا القيام بذلك عن طريق الأمر concat كما بالكود التالي:
Code

  let myArray = [1,2,3,4];
  let myNewArray = [5,6,7,8]
  console.log(myArray.concat(myNewArray));
و ستكون النتيجة كالتالي [1, 2, 3, 4, 5, 6, 7, 8] أيضا يمكننا أضافة عناصر أخري عند الدمج مثل الكود التالي:
Code

  let myArray = [1,2,3,4];
  let myNewArray = [5,6,7,8]
  console.log(myArray.concat(myNewArray,9,10,11));
و تكون النتيجة [1, 2, 3, 4, 5, 6, 7, 8, 9, 10, 11]

13- دمج العناصر بداخل الـ array

في الكثير من الأحيان يكون لدينا array و نريد عرضها للمستخدم , يمككنا عرضها باستخدام الكود التالي:
Code

  let myArray = [1,2,3,4];
  console.log(myArray);
سيتم العرض بتلك الطريقة [1, 2, 3, 4] و لكن ما اريده هو عرض عناصر الـ array كنص في تلك الحالة نستخدم الأمر join و هو يقوم بدمج جميع عناصر الـ array سويا
Code

  let myArray = [1,2,3,4];
  console.log(myArray.join());
و يكون النص الناتج كالتالي : 1,2,3,4 ماذا لو أردت تغيير ذلك النص فبدلا من أن يتم الفصل بين كل عنصر بـ ",” مثلا اذا أردت الفصل "-” بسهولة يمكن تغير الكود السابق كما يلي:
Code

  let myArray = [1,2,3,4];
  console.log(myArray.join('-'));
و ستظهر النتيجة كما يلي :1-2-3-4

14- الوصول لقيمة كل عنصر من الـ array عن طريق الـ loop

يمكن لجمل الـloop مثل for , while, do while الوصول لكل عنصر من عناصر الـ arry مثل المثال التالي:
Code

  let myArray = [1,2,3,4,5,6];
  for(var i = 0;i <myArray.length;i++)
  {
      console.log(myArray[i]);
  }
طريقة أخري لعمل loop هي إستخدام foreach و هي أكثر الطرق إستخداما في الحياة العملية بسبب أنها سهلة و لا يتتطلب تعيين متغير و استخدامه بزيادته 1 في كل دورة فالـ foreach تقوم بعمل ذلك كمثال الكود التالي:
Code

  myArray.forEach((myElemnt)=>{
    console.log(myElemnt);
    }
    )

15- عمل declaration لـ array بدون تعيين قيم لها

مثل أن تقوم بعمل array و تعيين قيمها بشكل dynamic بالكود مثل المثال التالي:
Code

  let myArray = new Array; //or let myArray = []; 
  for(var i = 0;i < 10;i++)
  {
   myArray.push(i);
  }
في المثال السابق نقوم بعمل array و بعد ذلك نقوم بتعيين عناصرها و وضع 10 عناصر من 0 لـ 9 عن طريق الكود

16- استخدام الـ map

من أجل إنشاء array جديدة بخصائص معدلة من array قائمة مثل:
Code

  const numbers = [1, 2, 3, 4, 5];
  const doubled = numbers.map(number => number * 2);
  console.log(doubled); // [2, 4, 6, 8, 10]
يتم تمرير لها callback function تطلب 3 parameters و هم (element, index, array) مع ملاحظة أن الـ index , array إختياريين.

17- الـ filter

يستخدم من أجل إنشاء array جديدة من array قديمة بعد إختيار بعض عناصر الـ array القديمة التي تحقق شرط معين مثل:
Code

  const numbers = [1, 2, 3, 4, 5];
  const evens = numbers.filter(number => number % 2 === 0);
  console.log(evens); // [2, 4]

18-الـ reduce

تستخدم لتنفيذ عملية على جميع مكونات المصفوفة من أجل إستخراج قيمة واحدة مثل جمع مكونات المصفوفة أو حاصل ضرب جميع مكوناتها و هكذا
Code

  const numbers = [1, 2, 3, 4, 5];
  const sum = numbers.reduce((acc, number) => acc + number, 0);
  console.log(sum); // 15
في المثال السابق يتم تمرير نوعين من الـ parameters للـ reduce الأولى هي callback function و الثانية هي القيمة الإبتدائية التي سيتم البناء عليها ففي المثال السابق يتم جمع عناصر المصفوفة و ناتج الجمع يبدأ بالصفر فيكون الناتج 15 في حالة وضع القيمة الإبتدائية بـ 1 مثلا فسيكون الناتج 16 أي أن يتم جمع عناصر المصفوفة و بعد ذلك اضافتها للقيمة الإبتدائية، أما الـ callback function ففي الغالب (أغلب الوقت) يتم تمرير لها قيمتين الـ accumulator و الـ number (أيضا يمكن تمرير قيم إختيارية index و array “الـ array التي يتم عمل عليها الـ reduce”).
و في هذا السياق قد نسأل أنفسنا لماذا قد نحتاج لتمرير المصفوفة التي نقةم بعمل reduce عليها للـ callback function بينما في الأساس نحن نقوم بإستدعاء الـreduce ك method من داخل المصفوفة نفسها، و هذه العملية يمكن أن يكون لها فوائد عديدة من ضمنها مثلا في حالة الحاجة لإستدعاء الـ array أو استخدامها لأي سبب نقوم بإستخدام الـ array التي يتم تمريرها للـ callback function لتجنب إستخدام الـ array الأصلية لأنها في تلك الحالة (الـ array الأصلية) تكون في scope خارجي (خارج scope الـ callback function ) و هي في تلك الحالة أفضل حيث سرعة أداء البرنامج و تجنب استخدام الـ closures مثلا:
Code

  const numbers = [1, 2, 3, 4, 5];
  const sum = numbers.reduce((acc, number,index,nums) => 
    {
      console.log(nums);
      return acc + number}
  , 0);
الكود السابق يكون أفضل أداءا من الكود التالي:
Code

  const numbers = [1, 2, 3, 4, 5];
  const sum = numbers.reduce((acc, number,index,nums) => 
    {
      console.log(numbers);
      return acc + number}
  , 0);
أيضا تمرير الـ array يدعم عدة أهداف منها تبسيط عملية البرمجة و دعم مبدأ استقلال الـ function بحيث تقوم بتحقيق العملية المطلوبة منها دون الحاجة للوصول للـ scope الخارجي (يتم تمرير جميع إحتياجتها البرمجية من خلال الـ parameters ).

19- الـ find

تستخدم لإسترجاع أول عنصر في المصفوفة يحقق الشرط مثل
Code

  const numbers = [1, 2, 3, 4, 5];
  const found = numbers.find(number => number > 3);
  console.log(found); // 4
في الكود السابق تحقق العناصر 4 و 5 الشرط المطلوب لكن find تقوم بإرجاع أول قيمة تحقق الشرط لذلك تقوم بإسترجاع 4.
الـ find يتم تمرير لها callback function تطلب 3 parameters و هم (element, index, array) مع ملاحظة أن الـ index , array إختياريين.
تقوم بإرجاع القيمة undefined إذا لم يتم ايجاد العنصر الذي يحقق الشرط.

20- الـ findIndex

تقوم بإرجاع الـ index الخاص بالعنصر الذي يحقق الشرط (أول عنصر يحقق الشرط) و تقوم بإرجاع 1- عندما لا تجد عنصر يحقق الشرط.
Code

  const numbers = [1, 2, 3, 4, 5];
  const index = numbers.findIndex(number => number > 3);
  console.log(index); // 3
في الكود السابق أول عنصر يحقق الشرط هو العنصر 4 و يكون ترتيبه 3 لأن الترتيب يبدأ من 0 كما نعلم. يتم تمرير لها callback function تطلب 3 parameters و هم (element, index, array) مع ملاحظة أن الـ index , array إختياريين.

21- الـ some

تحدد هل تحقق بعض عناصر الـ array شرط معين و تقوم بإرجاع true في حالة تحقيق الشرط و false في حالة عدم تحققه مثل:
Code

  const numbers = [1, 2, 3, 4, 5];
  const hasEven = numbers.some(number => number >  4);
  console.log(hasEven); // true
يتم تمرير لها callback function تطلب 3 parameters و هم (element, index, array) مع ملاحظة أن الـ index , array إختياريين.

22- الـ every

تحدد هل تحقق جميع عناصر الـ array الشرط أم لا و تقوم بإرجاع true في حالة تحقيق جميع العناصر للشرط و تقوم بإرجاع false في حالة إذا كان عنصر واحد فقط على الأقل لا يحقق الشرط مثل:
Code

  const numbers = [1, 2, 3, 4, 5];
  const allEven = numbers.every(number => number % 2 === 0);
  console.log(allEven); // false
يتم تمرير لها callback function تطلب 3 parameters و هم (element, index, array) مع ملاحظة أن الـ index , array إختياريين.

23- الـ includes

تتحقق من أن الـ array تحتوي على قيمة معينة أم لا و تقوم بإرجاع true في حالة أن الـ array تحتوي على عنصر بنفس القيمة و تقوم بإرجاع false في حالة عدم إحتوائها لعنصر بنفس القيمة مثل:
Code

  const numbers = [1, 2, 3, 4, 5];
  const includesThree = numbers.includes(3);
  console.log(includesThree); // true
و يتم تمرير لها 2 parameters الأول هو القيمة المراد البحث عنها و الثاني إختياري و هو الـ index الذي سنقوم بالبدء منه و في حالة عدم تمريره يتم إعتباره 0

24- الـ flat

عندما يكون هناك array تحتوي على عناصر متداخلة من الـ array مثل const nestedArray = [1, [2, [3, [4, 5]]]] يمكن إستخدام الـ flat لتبسيط التداخل بين الـ arrays مثل:
Code

  const nestedArray = [1, [2, [3, [4, 5]]]];
  const flatArray = nestedArray.flat(2);
  console.log(flatArray); // [1, 2, 3, [4, 5]]

25- الـ flatMap

تقوم تلك الـ method بتعيين array جديدة و تعيين بداخلها عناصر الـ array القديمة بعد اجراء تعديلات عليها و بعد ذلك إزالة الـ nested array أي أنها تجمع ما بين الـ map و الـ flat و يمكن استخدامها مثل:
Code

  const numbers = [1, 2, 3];
  const doubledAndFlattened = numbers.flatMap(number => [number,number * 2]);
  console.log(doubledAndFlattened); // [1, 2, 2, 4, 3, 6]
و لمعرفة الفرق بين الـ flatMap و الـ map يمكن إعادة كتابة الكود السابق بالـ map لمعرفة الفرق في النتيجة مثل:
Code

  const numbers = [1, 2, 3];
  const doubled = numbers.map(number => [number,number * 2]);
  console.log(doubled); 
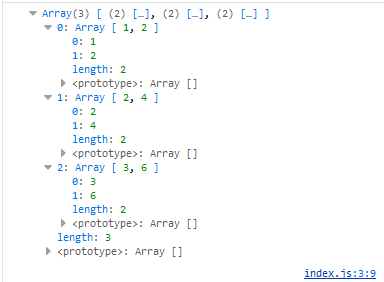
و تكون النتيجة: js array flatMap يمكن توضيح فائدة الـ flatMap بشكل عملي بالمثال التالي:
Code

  const sentences = ["Hello world", "This is flatMap", "JavaScript is cool"];
  const words = sentences.flatMap(sentence => sentence.split(' '));
  console.log(words);
  // Output: ["Hello", "world", "This", "is", "flatMap", "JavaScript", "is", "cool"]
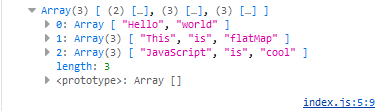
بينما بإستخدام الـ map مثل: js array map

26- الـ spread

و هي خاصية مهمة جدا تستخدم مع الـ array لتنفيذ العديد من العمليات بسهولة و بإختصار (كتابة كود أقل) و تستخدم الثلاثة نقاط "…” لكتابة جملة الـ spread ، و يمكن استخدامها في:
إنشاء array جديدة من array قديمة
Code

  const no = [1,2,3,4,5];
  const no1 = [...no];
و يلاحظ أن الـ array الجديدة تعتبر object منفصل تماما عن الـ array القديمة فمثلا:
Code

  const no = [1,2,3,4,5];
  const no1 = no;
  console.log(no === no1);//true
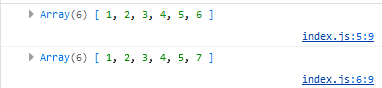
في الكود التالي عند إنشاء array من array أخرى فإن كلتاهما يكونا متطابقتين تماما بل أي تغيير في أحدهما يتم على الأخرى مثل:
Code

  const no = [1,2,3,4,5];
  const no1 = no;
  no.push(6);
  no1.push(7);
  console.log(no);
  console.log(no1);
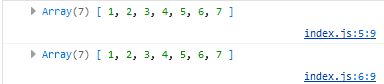
js array و هو ما يسمى بالـ reference type بينما عند استخدام الـ spread لا يحدث هذا الأمر مثل:
Code

  const no = [1,2,3,4,5];
  const no1 = [...no];
  no.push(6);
  no1.push(7);
  console.log(no);
  console.log(no1);
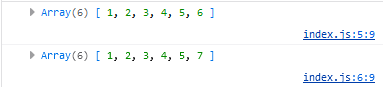
js array أي أننا قمنا بإنشاء array جديدة غير مرتبطة بالـ array القديمة و بالطبع يمكننا تحقيق ذلك بأكثر من طريقة مثل استخدام slice مثل الكود التالي:
Code

  const no = [1,2,3,4,5];
  const no1 = no.slice(0);
  no.push(6);
  no1.push(7);
  console.log(no);
  console.log(no1);
js array
سنتطرق في دروس لاحقة بتفصيل أكثر عن الـ reference type و لماذا يحدث إنشاء array جديدة عن طريق دمج عناصر من أكثر من arrays
يمكن أيضا عن طريق الـ spread syntax دمج عناصرمن أكثر من array معا بطريقة سهلة لإنشاء array جديدة مثل:
Code

const no = [1,2];
const no1 = [3,4];
const no2 = [5,6];
const myArray = [...no,...no1,...no2];
console.log(myArray);//[1,2,3,4,5,6]
إنشاء array جديدة عن طريق دمج عناصر من array قديمة بعناصر أخرى مثل:
Code

  const numbers = [2, 3, 4];
  const extendedArray = [1, ...numbers, 5];
  console.log(extendedArray); //[1, 2, 3, 4, 5]
تمرير عناصر array ك method parameters
Code

  const numbers = [1,2, 3];
  const myFun = (param1,param2,param3)=>param1+param2+param3;
  console.log(myFun(...numbers));//6
إنشاء array جديدة من عناصر array قديمة بعدحذف عناصر مكررة من array مثل:
Code

  const arrayWithDuplicates = [1, 2, 2, 3, 4, 4, 5];
  const uniqueArray = [...new Set(arrayWithDuplicates)];
  console.log(uniqueArray); // Output: [1, 2, 3, 4, 5]
في الكود السابق تم استخدام كلمة Set و هى object مدمج في لغة الجافاسكريبت تمكن من تعيين مجموعة من القيم و تتميز الـ Set بأنها قيم غير مكررة كما أنها لا تستخدم الـ index في الوصول للقيم بداخلها مما يعني أنه لا يمكن الوصول لعناصرها مثل الـ array كما بالمثال التالي:
Code

  const mySet = new Set([1,2,3]);
  console.log(mySet);

و تكون النتيجة js array set
Code

  console.log(mySet[0]); //undefined
و يلاحظ أن استخدام Set يؤدي لسرعة أفضل في الأداء و عدم تكرار القيم بداخلها و تحمل أي نوع من أنواع البيانات و حتى الـ Objects أيضا يمكن معرفة عدد عناصرها عن طريق خاصية size و ليس length مثل الـ array مثل:
Code

  console.log(mySet.size);//3
استخدامها مع الـ function مثلا عند استخدام الـ reduce في أمثلة سابقة كنا نطبق الـ reduce على array موجودة بالفعل و لكن يمكننا عن طريق إستخدام الـ spread من إنشاء function تقوم بإستخدام الـ reduce عن طريق الـ parameters الممرة لها مثل الكود التالي:
Code

  const sumAll = (...args) => args.reduce((sum, current) => sum + current, 0);
  console.log(sumAll(1, 2, 3, 4)); // Output: 10
  console.log(sumAll(5, 10, 15));  // Output: 30
استخدام الـ Destructuring
الـ Destructuring في الجافاسكريبت يمكننا من تقسيم الـ array أو الـ object لتبسيط و تنظيم الكود و إنشاء متغيرات جديدة من قيم بداخل الـ array أو الـ object مثل:
Code

  const numbers = [1, 2, 3, 4, 5];
  const [first, second, ...rest] = numbers;
  console.log(first);  // Output: 1
  console.log(second); // Output: 2
  console.log(rest);   // Output: [3, 4, 5]
في الكود السابق قمنا بإنشاء متغيرات جديدة تحمل أسماء first ، second و rest عن طريق تقسيم مكونات الـ array بشكل بسيط و دون الحاجة لكتابة الكثير من الكود

1/1/2/8 JavaScript fundamentals 'Arrays'

Web Development MEAN-Stack from A to Z Fundamentals Level1

We previously talked about the existence of two types of Data Types in JavaScript: the first is Primitive Types, and the second is Non-Primitive Types. Arrays and objects are among the Non-Primitive data types, and we will discuss the fundamental difference between them later when talking about how code is executed in JavaScript.
An array is a variable that can contain many variables and is one of the most common and widely used programming elements. Data has become the foundation of any application, and arrays were designed primarily to work with data. For example, if we were programming an application to manage warehouses, would it make sense to create a variable for each item in the warehouse? Even if we tried to do that, in real-life scenarios in web and application development, we deal with a large amount of data whose quantity we do not know and cannot predict how it will increase or decrease. In the case of a warehouse management program, new items may appear that were not known at the time of programming, or items may disappear from the market. This is where the importance of arrays comes into play, as we can write a single variable that contains any number of items, as in the following example:
Code

    let products = ['sugar','oil','rice','salt'];
Arrays are considered a special type of data type and can work with any other data type. In other words, an array can contain multiple types of data types, and it can also contain other arrays, which are called nested arrays, like:
let myArray = [1,"hi",[1,2,3]];
Arrays contain sequential data, and each element inside the array has an index that starts from 0 and ends at a number equal to the number of elements in the array minus 1. In the previous example, there are 4 elements in the array. The first element, sugar, has an index of 0, and the last element, salt, has an index equal to the number of elements in the array minus 1, which is 4 - 1 = 3. The index is the basis of how arrays work, as through it we can access any element in the array. For example, if we want to print the first element of the array, we can use the following code:
Code

    console.log(products[0]);
And it will print sugar, the first element of the array. So, to deal with the value of any element in the array, we write the name of the array followed by the index number of the element in square brackets [].

Array Operations

1- Finding the number of elements in the array

Using length as in the following code:
Code

    console.log(products.length);
And we can access the value of the last element in the array by finding its index, which is length – 1, as in the following code:
Code

     console.log(products[products.length -1]);

2- Accessing an array inside an array and retrieving a value from it

In the case of a nested array, we can access the inner array as in the following example:
Code

    let myArray = [1,"hi",[1,2,3]];
    console.log(myArray[2][0]);
And thus, the console will print the number 1.

3- Changing the value of an element in the array

Like any variable, we can reassign its value. Similarly, in arrays, we can reassign the value by specifying the element with its index and giving it a new value, like:
Code

    let products = ['sugar','oil','rice','salt'];
    products[0] = 'pasta';
    document.write(products);
And when this code is executed, the following names will be written: pasta,oil,rice,salt

4- Adding an element to the array

An element can be added to the array in more than one way.

Adding an element at the end of the array

For example, if an array contains the elements 1, 2, 3, and we want to add the number 4 at the end of the array after the number 3, we use push, as in the following code:
Code

    let myArray = [1,2,3]
    myArray.push(4);
    document.write(myArray);
And the result of the code will be writing 1,2,3,4. We can also add multiple elements, not just one. For example, if we modify the code like this:
Code

    myArray.push(4,5,6);
The result of the code will be: 1,2,3,4,5,6

Adding an element at the beginning of the array

This can be done using unshift, as in the following code:
Code

    let myArray = [1,2,3]
    myArray.unshift(0);
    document.write(myArray);
And thus, the result will be 0,1,2,3. Also, unshift can take more than one element, for example:
Code

    let myArray = [1,2,3]
    myArray.unshift(-1,0);
    document.write(myArray);
And thus, the result will be: -1,0,1,2,3

5- Deleting an element from the array

An element can also be deleted from the array in two ways.

Deleting an element from the end of the array

This can be done using pop, as in the following example:
Code

    let myArray = [0,1,2,3]
    myArray.pop();
    document.write(myArray);
And thus, the output will be 0,1,2.
It is noted that the pop command is the opposite of the push command, but we do not pass any value to it, and logically, because we only want to delete an element, and the value of the element to be deleted is not important, while when adding an element, we must specify the value of the element to be added, so we pass its value in the push command.
It is also noted that the pop command deletes the last element of the array and retains it, and we can verify this using the following code:
Code

    let myArray = [0,1,2,3]
    console.log(myArray.pop());
And it will write 3 in the console when executing the command.

Deleting an element from the beginning of the array

Using the shift command, which is also the opposite of the unshift command we used to add an element, and like the pop command, the shift command deletes an element from the beginning of the array and retains it, as in the following code:
Code

    let myArray = [0,1,2,3]
    console.log(myArray.shift());
    document.write(myArray);
When executing this code, it will write on the page 1,2,3 and in the console, it will write the value 0.

6- Deleting one or more elements from the array

The splice command can be used to perform this task, and it is a very important command that can be used to perform complex deletion and addition tasks on the array. A number of values are passed to this command: the first is the index from which we will start deleting, and then the number of elements to be deleted from the array, as follows:
Code

    let myArray = [1,2,3,4];
    myArray.splice(1,2)
    document.write(myArray);
And thus, the result will be 1,4 because we passed the starting index as 1, which means starting from the second element of the array, and we specified the number of elements to be deleted as 2, so it deleted the second and third elements. In fact, the splice command does not delete elements of the array; it cuts the array and retains the cut elements in another array, as in the following code:
Code

    let myArray = [1,2,3,4];
    let myNewArray = myArray.splice(1,2);
    document.write("my old array: " + myArray);
    document.write(' my new array: ' + myNewArray);
And thus, the result will be:

7- Replacing elements in the array

What if we wanted, as in the previous example, to delete a group of elements but add another group of elements in their place? We can use the splice command itself and pass the elements to be added after specifying the starting element and the number of elements to be deleted, as follows:
Code

    let myArray = [1,2,3,4];
    myArray.splice(0,2,-1,-2);
    document.write(myArray);
In the previous code, I deleted two elements from the array starting from position 0 (the beginning of the array) and added two other elements in their place. Any number of elements can be added without being restricted to a specific number. We can delete two elements and add 4 or 5 elements depending on our needs.
Code

    In the previous code, I deleted two elements from the array starting from position 0 (the beginning of the array) and added two other elements in their place. Any number of elements can be added without being restricted to a specific number. We can delete two elements and add 4 or 5 elements depending on our needs.

8- Adding elements to the array

We previously talked about how to add an element to the beginning or end of the array, but what if we wanted to add an element in the middle of the array? We can use more than one method, for example, we can use the previous splice command but without specifying the number of elements to be deleted, as follows:
Code

    let myArray = [1,2,3,4];
    myArray.splice(2,0,2.5,2.6);
    document.write(myArray);
And the result will be 1,2,2.5,2.6,3,4. Here we notice that by not specifying the number of elements to be deleted, the splice command shifted the third element, which has an index of 2, to place the added elements in its place and precede it in order.

9- Creating a new array with elements from an existing array

The `slice` command can be used to accomplish this task as follows:
Code

    let myArray = [0,1,2,3,4,5,6,7]
    let myNewArray = myArray.slice(1,4);
    document.write('my old array: ' + myArray + " my new array: " + myNewArray);
  
The result of executing the code will be: my old array: 0,1,2,3,4,5,6,7 my new array: 1,2,3
Note that the `slice` command, unlike `splice`, does not take the number of elements to be executed but takes two values: the start index and the end index. Also, the entire array can be copied if no start and end values are passed. If we specify the start index and do not specify the end index, the elements from the start index to the end of the array will be copied. Additionally, elements of the array can be handled in reverse order from the end to the beginning when using negative index numbers, such as:

    let myArray = [0,1,2,3,4,5,6,7]
    let myNewArray = myArray.slice(-4,-1);
    document.write('my old array: ' + myArray + " my new array: " + myNewArray);
  
The result of executing the code will be: my old array: 0,1,2,3,4,5,6,7 my new array: 4,5,6

10- Checking if an element exists inside the array

We can search inside the array using `indexOf`, which allows us to know the index number containing the value we are searching for, as in the following code:
Code

    let myArray = ['sugar','oil','rice','salt']
    console.log(myArray.indexOf('oil'));
  
In the previous code, the result will be 1, meaning that `oil` is indeed present and is in the second element (it returns the index number). It returns -1 if no element with the searched value is found. Also, we can start searching from a specific index, as in the following code:
Code

    let myArray = ['sugar','oil','rice','salt']
    console.log(myArray.indexOf('oil',2));
  
It searches for `oil` but starts from the third element, and of course, it will show -1 because it will not be present relative to it. Also, if the element is repeated more than once, it will return the index of the first element it finds with that value.
Code

    let myArray = ['sugar','oil','rice','oil','salt']
    console.log(myArray.indexOf('oil'));
  
In this code, it will return the number 1 again. What if we want the last index that holds the searched value? In that case, we can use `lastIndexOf` as in the following code:
Code

    let myArray = ['sugar','oil','rice','oil','salt']
    console.log(myArray.lastIndexOf('oil'));
  
The result will be 3.

11- Reordering the elements of the array

The `sort` command can be used to order the array as in the following code:
Code

    let myArray = ['sugar','oil','rice','salt']
    console.log(myArray.sort());
  
The result of this operation will be ['oil', 'rice', 'salt', 'sugar']. It can also be used to order an array containing numeric values, such as:
Code

    let myArray = [1,3,0,2,9,7,8]
    console.log(myArray.sort());
  
The result of this operation will be [0, 1, 2, 3, 7, 8, 9]. There is also a command related to ordering called `reverse`, which reverses the order as in the following code:
Code

    let myArray = [1,3,0,2,9,7,8]
    console.log(myArray.reverse());
  
The result of this code will be [8, 7, 9, 2, 0, 3, 1]. Both commands can be used together for descending order from largest to smallest, as in the following code:
Code

    let myArray = [1,3,0,2,9,7,8]
    console.log(myArray.sort().reverse());
  
Thus, the result of the code will be [9, 8, 7, 3, 2, 1, 0].

12- Merging between multiple arrays

Assuming we want to merge an array containing the following values 1, 2, 3, 4 and another array containing the values 5,6,7,8, we can do this using the `concat` command as in the following code:
Code

    let myArray = [1,2,3,4];
    let myNewArray = [5,6,7,8]
    console.log(myArray.concat(myNewArray));
  
The result will be as follows: [1, 2, 3, 4, 5, 6, 7, 8]. We can also add other elements during the merge, such as in the following code:
Code

    let myArray = [1,2,3,4];
    let myNewArray = [5,6,7,8]
    console.log(myArray.concat(myNewArray,9,10,11));
  
The result will be [1, 2, 3, 4, 5, 6, 7, 8, 9, 10, 11].

13- Merging elements inside the array

Often, we have an array and want to display it to the user. We can display it using the following code:
Code

    let myArray = [1,2,3,4];
    console.log(myArray);
  
It will be displayed in this way: [1, 2, 3, 4]. But what if I want to display the array elements as text? In that case, we use the `join` command, which combines all the elements of the array together.
Code

    let myArray = [1,2,3,4];
    console.log(myArray.join());
  
The resulting text will be as follows: 1,2,3,4. What if I want to change that text so that instead of separating each element with a comma, I want to separate them with a hyphen? It can be easily changed as follows:
Code

    let myArray = [1,2,3,4];
    console.log(myArray.join('-'));
  
The result will appear as follows: 1-2-3-4.

14- Accessing the value of each element in the array using a loop

Loop statements like `for`, `while`, `do while` can access each element of the array, as in the following example:
Code

    let myArray = [1,2,3,4,5,6];
    for(var i = 0;i < myArray.length;i++)
    {
        console.log(myArray[i]);
    }
  
Another way to loop is by using `forEach`, which is the most commonly used method in practical life because it is easy and does not require assigning a variable and incrementing it by 1 in each cycle. The `forEach` does that, as in the following code example:
Code

    myArray.forEach((myElemnt)=>{
      console.log(myElemnt);
      }
      )
  

15- Declaring an array without assigning values to it

Such as creating an array and assigning its values dynamically in the code, as in the following example:
Code

    let myArray = new Array; //or let myArray = []; 
    for(var i = 0;i < 10;i++)
    {
     myArray.push(i);
    }
  
In the previous example, we create an array and then assign its elements and place 10 elements from 0 to 9 using the code.

16- Using the map

To create a new array with modified properties from an existing array, such as:
Code

    const numbers = [1, 2, 3, 4, 5];
    const doubled = numbers.map(number => number * 2);
    console.log(doubled); // [2, 4, 6, 8, 10]
  
A callback function is passed to it, which requires 3 parameters: (element, index, array), with the note that the index and array are optional.

17- The filter

It is used to create a new array from an old array after selecting some elements from the old array that meet a specific condition, such as:
Code

     const numbers = [1, 2, 3, 4, 5];
     const evens = numbers.filter(number => number % 2 === 0);
     console.log(evens); // [2, 4]
   

18- The reduce

It is used to perform an operation on all components of the array to extract a single value, such as summing the components of the array or multiplying all its components, and so on.
Code

     const numbers = [1, 2, 3, 4, 5];
     const sum = numbers.reduce((acc, number) => acc + number, 0);
     console.log(sum); // 15
   
In the previous example, two types of parameters are passed to reduce: the first is the callback function, and the second is the initial value that will be built upon. In the example above, the elements of the array are summed, and the sum starts from zero, so the result is 15. If the initial value is set to 1, for example, the result will be 16, meaning the elements of the array are summed and then added to the initial value. As for the callback function, it is usually (most of the time) passed two values: the accumulator and the number (optional values index and array, "the array on which the reduce is performed" can also be passed).
In this context, we might ask ourselves why we might need to pass the array on which we are performing the reduce to the callback function, while essentially we are calling the reduce as a method from within the array itself. This process can have many benefits, including, for example, in case of needing to call the array or use it for any reason, we use the array passed to the callback function to avoid using the original array because, in that case (the original array), it is in an external scope (outside the scope of the callback function), and it is better in that case for program performance speed and avoiding the use of closures, for example:
Code

     const numbers = [1, 2, 3, 4, 5];
     const sum = numbers.reduce((acc, number,index,nums) => 
       {
         console.log(nums);
         return acc + number}
     , 0);
   
The previous code performs better than the following code:
Code

     const numbers = [1, 2, 3, 4, 5];
     const sum = numbers.reduce((acc, number,index,nums) => 
       {
         console.log(numbers);
         return acc + number}
     , 0);
   
Passing the array also supports several goals, including simplifying the programming process and supporting the principle of function independence so that it achieves the required operation without needing to access the external scope (all its programming needs are passed through the parameters).

19- The find

It is used to retrieve the first element in the array that meets the condition, such as:
Code

     const numbers = [1, 2, 3, 4, 5];
     const found = numbers.find(number => number > 3);
     console.log(found); // 4
   
In the previous code, the elements 4 and 5 meet the required condition, but find returns the first value that meets the condition, so it retrieves 4.
The find is passed a callback function that requires 3 parameters: (element, index, array), with the note that the index and array are optional.
It returns the value undefined if no element is found that meets the condition.

20- The findIndex

It returns the index of the element that meets the condition (the first element that meets the condition) and returns -1 when no element is found that meets the condition.
Code

     const numbers = [1, 2, 3, 4, 5];
     const index = numbers.findIndex(number => number > 3);
     console.log(index); // 3
   
In the previous code, the first element that meets the condition is the element 4, and its index is 3 because the index starts from 0 as we know. It is passed a callback function that requires 3 parameters: (element, index, array), with the note that the index and array are optional.

21- The some

It determines whether some elements of the array meet a specific condition and returns true if the condition is met and false if it is not met, such as:
Code

     const numbers = [1, 2, 3, 4, 5];
     const hasEven = numbers.some(number => number >  4);
     console.log(hasEven); // true
   
It is passed a callback function that requires 3 parameters: (element, index, array), with the note that the index and array are optional.

22- The every

It determines whether all elements of the array meet the condition or not and returns true if all elements meet the condition and returns false if at least one element does not meet the condition, such as:
Code

     const numbers = [1, 2, 3, 4, 5];
     const allEven = numbers.every(number => number % 2 === 0);
     console.log(allEven); // false
   
It is passed a callback function that requires 3 parameters: (element, index, array), with the note that the index and array are optional.

23- The includes

It checks whether the array contains a specific value or not and returns true if the array contains an element with the same value and returns false if it does not contain an element with the same value, such as:
Code

     const numbers = [1, 2, 3, 4, 5];
     const includesThree = numbers.includes(3);
     console.log(includesThree); // true
   
It is passed 2 parameters: the first is the value to search for, and the second is optional and is the index from which to start. If it is not passed, it is considered 0.

24- The flat

When there is an array that contains nested array elements, such as const nestedArray = [1, [2, [3, [4, 5]]]], the flat can be used to simplify the nesting between arrays, such as:
Code

     const nestedArray = [1, [2, [3, [4, 5]]]];
     const flatArray = nestedArray.flat(2);
     console.log(flatArray); // [1, 2, 3, [4, 5]]
   

25- The flatMap

This method creates a new array and assigns elements from the old array after making modifications to them and then removes the nested array, meaning it combines both map and flat, and can be used like:
Code

     const numbers = [1, 2, 3];
     const doubledAndFlattened = numbers.flatMap(number => [number,number * 2]);
     console.log(doubledAndFlattened); // [1, 2, 2, 4, 3, 6]
   
To understand the difference between flatMap and map, the previous code can be rewritten using map to see the difference in the result, such as:
Code

     const numbers = [1, 2, 3];
     const doubled = numbers.map(number => [number,number * 2]);
     console.log(doubled); 
   
And the result is: js array flatMap The benefit of flatMap can be demonstrated practically with the following example:
Code

     const sentences = ["Hello world", "This is flatMap", "JavaScript is cool"];
     const words = sentences.flatMap(sentence => sentence.split(' '));
     console.log(words);
     // Output: ["Hello", "world", "This", "is", "flatMap", "JavaScript", "is", "cool"]
   
While using map like: js array map

26- The spread

It is a very important feature used with arrays to perform many operations easily and concisely (writing less code) and uses the three dots "..." to write the spread syntax, and it can be used in:
Creating a new array from an old array
Code

     const no = [1,2,3,4,5];
     const no1 = [...no];
   
And it is noted that the new array is considered a completely separate object from the old array, for example:
Code

     const no = [1,2,3,4,5];
     const no1 = no;
     console.log(no === no1);//true
   
In the following code, when creating an array from another array, both are completely identical, and any change in one is applied to the other, such as:
Code

     const no = [1,2,3,4,5];
     const no1 = no;
     no.push(6);
     no1.push(7);
     console.log(no);
     console.log(no1);
   
js array And this is called the reference type, while when using spread, this does not happen, such as:
Code

     const no = [1,2,3,4,5];
     const no1 = [...no];
     no.push(6);
     no1.push(7);
     console.log(no);
     console.log(no1);
   
js array That is, we have created a new array that is not linked to the old array, and of course, we can achieve this in more than one way, such as using slice, as in the following code:
Code

     const no = [1,2,3,4,5];
     const no1 = no.slice(0);
     no.push(6);
     no1.push(7);
     console.log(no);
     console.log(no1);
   
js array
We will discuss in later lessons in more detail about the reference type and why it happens. Creating a new array by merging elements from multiple arrays
It is also possible to merge elements from multiple arrays together easily using the spread syntax to create a new array, such as:
Code

   const no = [1,2];
   const no1 = [3,4];
   const no2 = [5,6];
   const myArray = [...no,...no1,...no2];
   console.log(myArray);//[1,2,3,4,5,6]
   
Creating a new array by merging elements from an old array with other elements, such as:
Code

     const numbers = [2, 3, 4];
     const extendedArray = [1, ...numbers, 5];
     console.log(extendedArray); //[1, 2, 3, 4, 5]
   
Passing array elements as method parameters
Code

         const numbers = [1,2, 3];
         const myFun = (param1,param2,param3)=>param1+param2+param3;
         console.log(myFun(...numbers));//6
       
Creating a new array from an old array after removing duplicate elements from the array like:
Code

         const arrayWithDuplicates = [1, 2, 2, 3, 4, 4, 5];
         const uniqueArray = [...new Set(arrayWithDuplicates)];
         console.log(uniqueArray); // Output: [1, 2, 3, 4, 5]
       
In the previous code, the word Set was used, which is a built-in object in JavaScript that allows you to set a collection of values. The Set is characterized by having unique values and does not use an index to access the values inside it, which means that its elements cannot be accessed like an array, as shown in the following example:
Code

         const mySet = new Set([1,2,3]);
         console.log(mySet);
       
And the result is js array set
Code

         console.log(mySet[0]); //undefined
       
It is noted that using Set leads to better performance, no duplicate values inside it, and it can hold any type of data, including Objects. You can also find out the number of its elements using the size property, not length like an array, for example:
Code

         console.log(mySet.size);//3
       
Using it with functions, for example, when using reduce in previous examples, we were applying reduce to an existing array, but we can create a function that uses reduce through the parameters passed to it using spread, as in the following code:
Code

         const sumAll = (...args) => args.reduce((sum, current) => sum + current, 0);
         console.log(sumAll(1, 2, 3, 4)); // Output: 10
         console.log(sumAll(5, 10, 15));  // Output: 30
       
Using Destructuring
Destructuring in JavaScript allows us to split an array or object to simplify and organize the code and create new variables from values inside the array or object, for example:
Code

         const numbers = [1, 2, 3, 4, 5];
         const [first, second, ...rest] = numbers;
         console.log(first);  // Output: 1
         console.log(second); // Output: 2
         console.log(rest);   // Output: [3, 4, 5]
       
In the previous code, we created new variables named first, second, and rest by splitting the components of the array in a simple way without the need to write a lot of code.

February 28, 2025

Read More
إقرأ المزيد

دورة تدريبية

Course

4/2/1/1 أساسيات الجافاسكريبت 'التعامل مع التاريخ و الوقت'

1/1/2/4 JavaScript fundamentals 'Handling Date and Time'

دورة تدريبية

Course

2/1/1/1 قصة الجافاسكريبت

1/1/1/2 The Story of JavaScript

دورة تدريبية

Course

1/2/1/1 أساسيات الجافاسكريبت'المتغيرات'

1/1/2/1 JavaScript fundamentals 'Variables'

التسويق الرياضي في أندية الشركات و صناعة الجماهيرية

Sports Marketing in Corporate Clubs and the Fanbase Industry

دورة تدريبية

Course

5/2/1/1 أساسيات الجافاسكريبت 'الجمل الشرطية Conditional statements'

1/1/2/5 JavaScript fundamentals 'Conditional Statements'

Keywords
كلمات مفتاحية

دورة الأنجولر بالعربي دورة تطوير المواقع الإلكترونية mean-stack دورة الـ دورة النود بالعربي دورة الـ mean-stack from a to z

angular arabic courseweb development coursemean-stack coursenode js arabic coursecourse mean-stack from a to zcourse mean-stack from a to z

© 2026 Ahmed Zayed. All rights reserved.© 2026 كل الحقوق محفوظة أحمد زايد